
May 31, 2026 · MarkeReviews Team · 12 min read
JWT Authentication for Beginners: Secure REST APIs
JWT authentication lets a client prove its identity to an API by sending a signed token with each protected request. After a user logs in, the server issues a JSON Web Token (JWT). The client then sends that token in the Authorization header using the Bearer scheme. Before returning protected data, the API verifies the token signature and checks important claims such as its expiration time.
This guide explains the complete flow and shows how to secure a small Python REST API with Flask and PyJWT. It also covers the mistakes that matter most in real applications: treating signed tokens as encrypted data, accepting unexpected algorithms, creating long-lived tokens, and storing secrets in source code.
If REST endpoints, HTTP methods, and status codes are still new to you, start with how RESTful APIs work.
What Is JWT Authentication?
JWT authentication is a token-based authentication method in which a server issues a signed JSON Web Token after verifying a user’s credentials. The client sends that token with later requests, and the server validates it before granting access to protected resources.
JWT stands for JSON Web Token. RFC 7519 defines JWT as a compact format for representing claims between parties. A claim is a piece of information such as a user ID, an expiration time, or the intended audience for a token.
JWTs are useful for APIs because they are compact enough to send in an HTTP header and can be verified without loading server-side session data for every request. That does not mean JWTs are always the best choice. A traditional session cookie may be simpler for a server-rendered web application. JWTs are most useful when a stateless API, a mobile client, or multiple services need a portable token format.
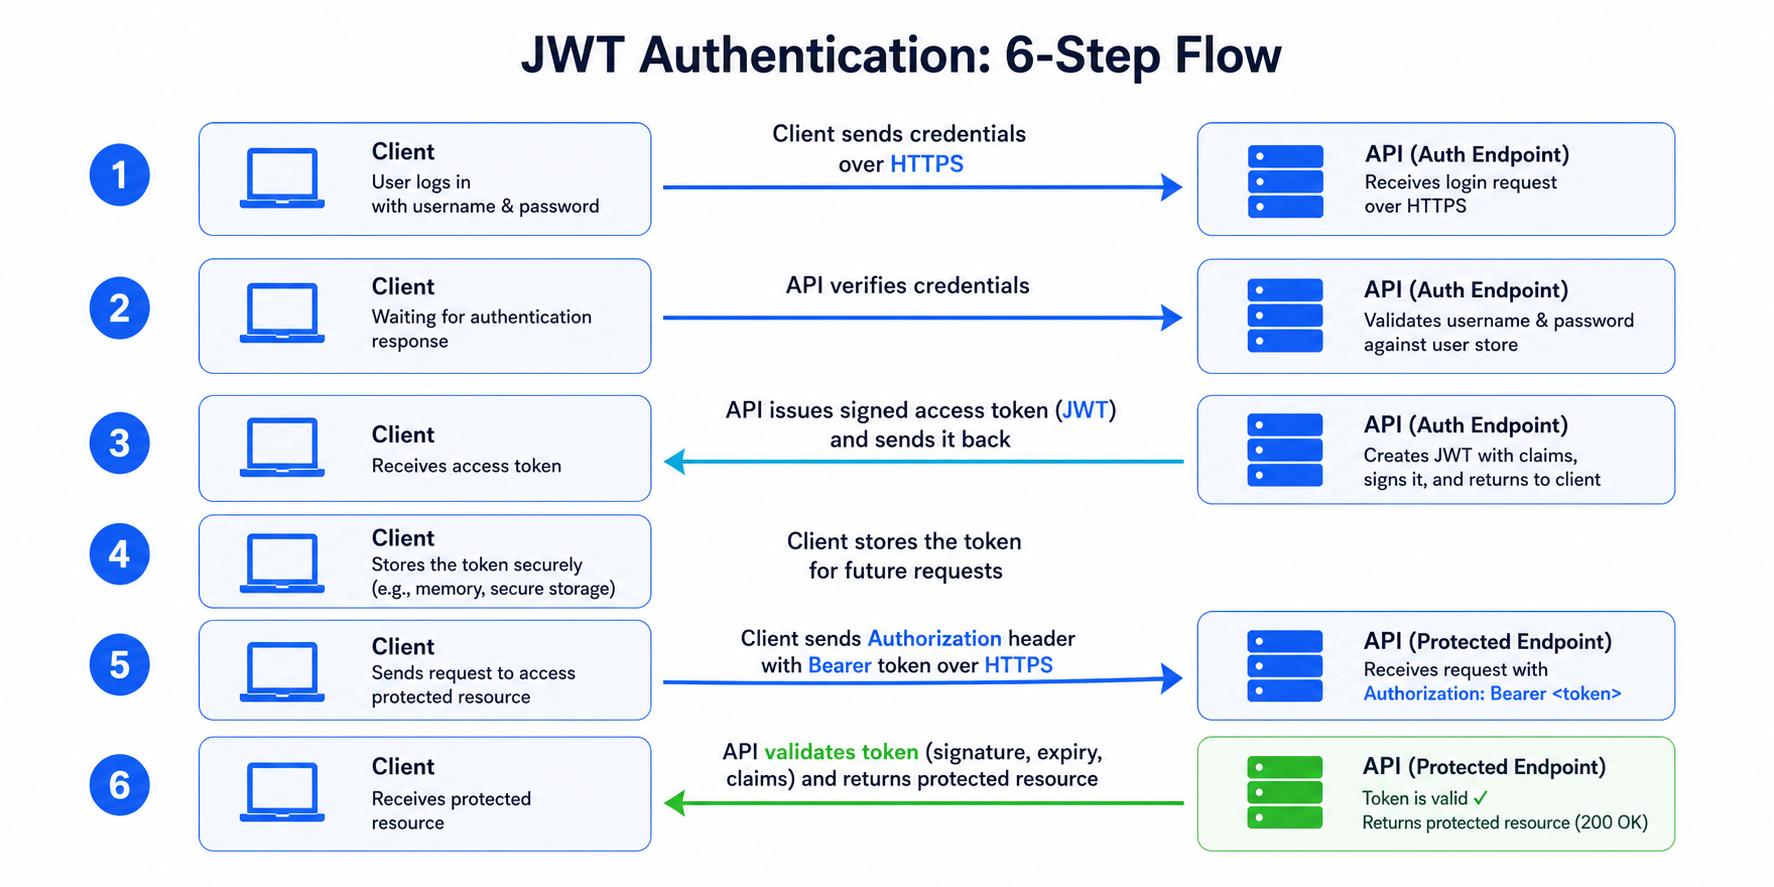
The API issues a signed token after login. The client presents it when requesting a protected resource.
How a JWT Is Structured
A compact JWT contains three Base64url-encoded parts separated by periods:
header.payload.signature
A shortened example looks like this:
eyJhbGciOiJIUzI1NiIsInR5cCI6IkpXVCJ9
.
eyJzdWIiOiIxMjMiLCJleHAiOjE3MTcwMDAwMDB9
.
signature-value
Header
The header describes how the token is protected. A typical signed token includes an algorithm and a token type:
{
  "alg": "HS256",
  "typ": "JWT"
}
Payload
The payload contains claims:
{
  "sub": "123",
  "iss": "https://api.example.com",
  "aud": "markereviews-client",
  "iat": 1716999100,
  "exp": 1717000000
}
Common registered claims include:
| Claim | Meaning | Why it matters |
|---|---|---|
sub |
Subject | Identifies the user or entity represented by the token |
iss |
Issuer | Identifies the system that created the token |
aud |
Audience | Identifies the service that should accept the token |
iat |
Issued at | Records when the token was created |
nbf |
Not before | Prevents use before a specified time |
exp |
Expiration time | Prevents use after a specified time |
Signature
The signature protects the integrity of the token. When an API validates the signature, it can detect whether someone changed the header or payload after the token was issued.
A signed JWT is not encrypted by default. Anyone who obtains a typical signed JWT can decode its header and payload. Do not place passwords, private keys, payment details, or sensitive personal data inside a token. For a deeper explanation of confidentiality, integrity, hashing, and keys, read what encryption is and how it works.
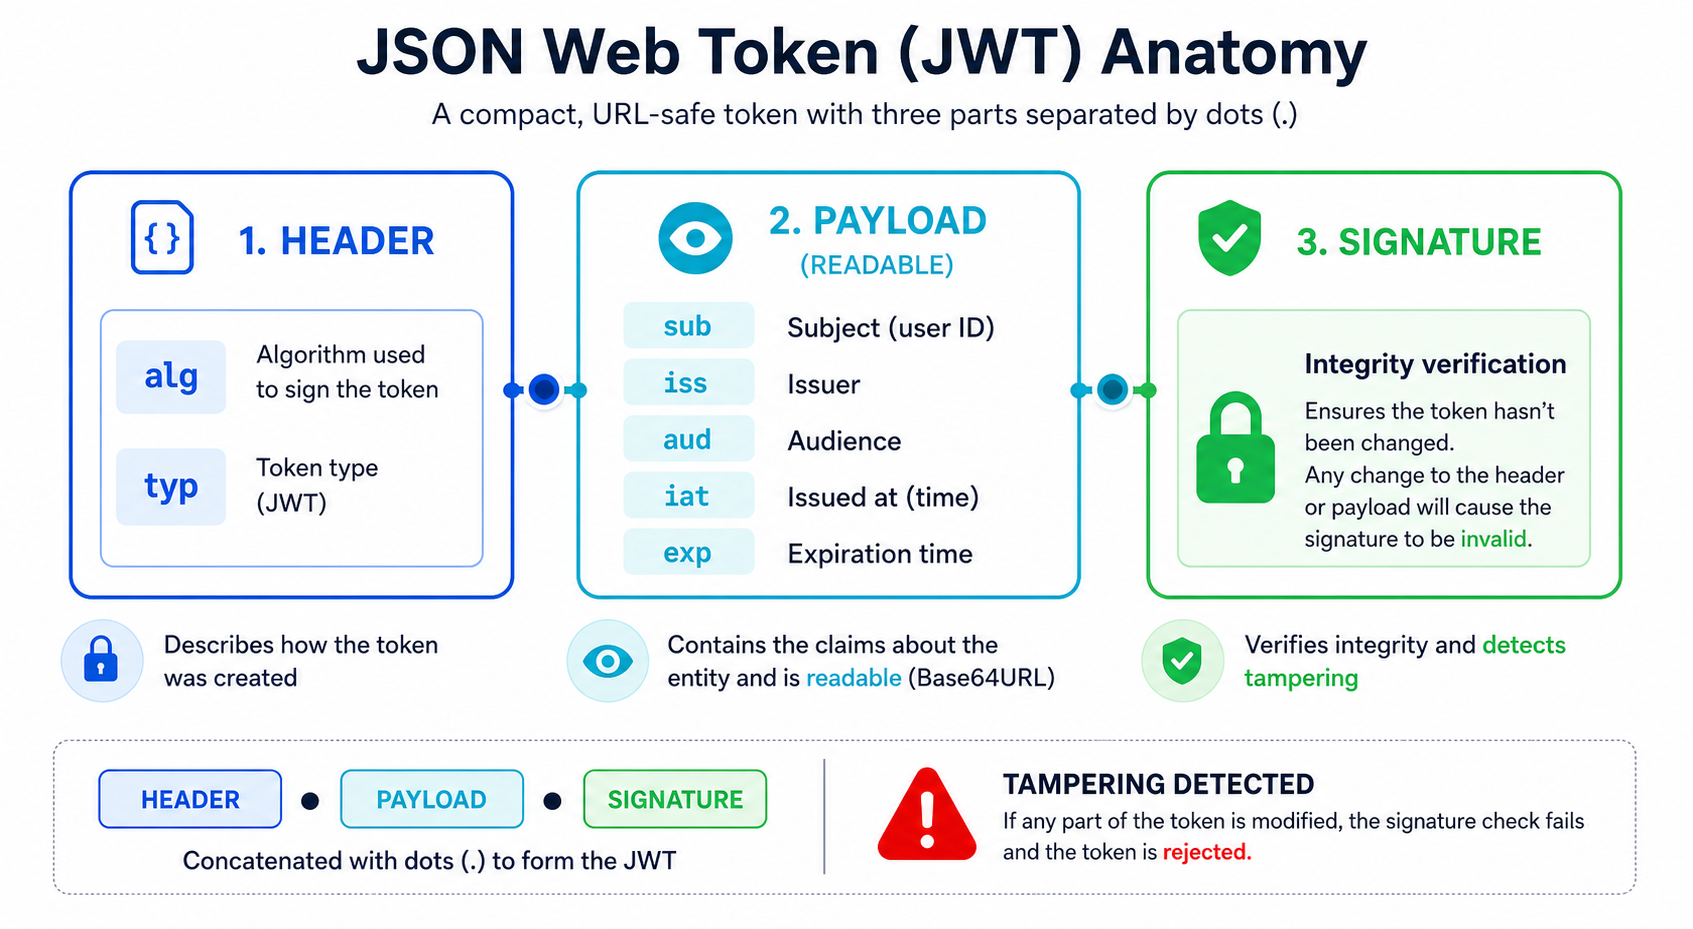
A signed JWT has a header, payload, and signature. The payload is readable, while the signature detects tampering.
JWT Authentication Flow Step by Step
A basic login flow works like this:
- The client sends an email and password to a login endpoint over HTTPS.
- The server checks the credentials against a password hash stored in its database.
- The server creates a short-lived access token with claims such as
sub,iss,aud,iat, andexp. - The client sends the access token with protected requests:
Authorization: Bearer <access-token>
- The API verifies the signature, accepts only the configured algorithm, checks required claims, and confirms that the token is not expired.
- If validation succeeds, the API handles the request. If validation fails, it returns an authentication error.
The MDN documentation for the Authorization header describes the general HTTP syntax for sending credentials. In a JWT-based API, Bearer is the commonly used authentication scheme.
Build a JWT-Protected Flask API
The following small project shows the essential mechanics. It is intentionally compact so you can understand each step. For a broader introduction to routes, JSON responses, and CRUD endpoints, follow the beginner guide to building a Python API.
Step 1: Install the Dependencies
Create a virtual environment and install Flask and PyJWT:
python -m venv .venv
source .venv/bin/activate
pip install Flask PyJWT
Generate a secret outside your source code and expose it as an environment variable:
export JWT_SECRET="$(python -c 'import secrets; print(secrets.token_urlsafe(48))')"
Never commit the secret to Git. In production, store secrets in a dedicated secret manager or a protected deployment configuration.
Step 2: Create the Application
Save this example as app.py:
import os
from datetime import datetime, timedelta, timezone
from functools import wraps

import jwt
from flask import Flask, jsonify, request
from werkzeug.security import check_password_hash, generate_password_hash

app = Flask(__name__)

JWT_SECRET = os.environ["JWT_SECRET"]
JWT_ALGORITHM = "HS256"
JWT_ISSUER = "https://api.example.com"
JWT_AUDIENCE = "markereviews-client"

# Demo only: use a database in a real application.
users = {
    "alex@example.com": {
        "id": "user-123",
        "password_hash": generate_password_hash("change-this-demo-password"),
    }
}


def create_access_token(user_id):
    now = datetime.now(timezone.utc)
    payload = {
        "sub": user_id,
        "iss": JWT_ISSUER,
        "aud": JWT_AUDIENCE,
        "iat": now,
        "exp": now + timedelta(minutes=15),
    }
    return jwt.encode(payload, JWT_SECRET, algorithm=JWT_ALGORITHM)


def decode_access_token(token):
    return jwt.decode(
        token,
        JWT_SECRET,
        algorithms=[JWT_ALGORITHM],
        issuer=JWT_ISSUER,
        audience=JWT_AUDIENCE,
        options={"require": ["sub", "iss", "aud", "iat", "exp"]},
    )


def require_access_token(view_function):
    @wraps(view_function)
    def wrapped_view(*args, **kwargs):
        header = request.headers.get("Authorization", "")
        scheme, _, token = header.partition(" ")

        if scheme.lower() != "bearer" or not token:
            return jsonify({"error": "Missing bearer token"}), 401

        try:
            claims = decode_access_token(token)
        except jwt.ExpiredSignatureError:
            return jsonify({"error": "Token has expired"}), 401
        except jwt.InvalidTokenError:
            return jsonify({"error": "Invalid token"}), 401

        return view_function(claims, *args, **kwargs)

    return wrapped_view


@app.post("/login")
def login():
    body = request.get_json(silent=True) or {}
    user = users.get(body.get("email"))

    if not user or not check_password_hash(
        user["password_hash"], body.get("password", "")
    ):
        return jsonify({"error": "Invalid credentials"}), 401

    return jsonify({"access_token": create_access_token(user["id"])})


@app.get("/profile")
@require_access_token
def profile(claims):
    return jsonify({"user_id": claims["sub"], "message": "Protected profile"})


if __name__ == "__main__":
    app.run()
The example uses Werkzeug’s password hashing helpers rather than storing a plaintext password. It also requires sub, iss, aud, iat, and exp when decoding tokens. PyJWT documents that validation options should explicitly require claims when your application depends on their presence.
Step 3: Run and Test the API
Start the Flask development server:
python app.py
Log in with the demo credentials:
curl --request POST http://127.0.0.1:5000/login \
  --header "Content-Type: application/json" \
  --data '{"email":"alex@example.com","password":"change-this-demo-password"}'
The response contains an access token:
{
  "access_token": "<your-token>"
}
Use it to request the protected profile:
curl http://127.0.0.1:5000/profile \
  --header "Authorization: Bearer <your-token>"
For manual testing workflows beyond curl, compare the best API testing tools.
Access Tokens, Refresh Tokens, and Sessions
JWT authentication is often discussed as if every token has the same job. In practice, applications usually separate access from renewal.
Access Token
An access token is sent to an API and should usually be short-lived. If an attacker steals it, a short expiration limits how long it remains useful.
Refresh Token
A refresh token is used to obtain a new access token after the old one expires. It has a longer lifetime and needs stronger protection. A production system should support revocation and rotation rather than treating refresh tokens as permanent credentials.
Session Cookie
A traditional server-side session stores session data on the server and gives the browser an opaque session identifier, commonly in a cookie. This is often simpler for a server-rendered application. The OWASP JWT cheat sheet explicitly notes that JWT is not the right fit for every application and that traditional sessions remain worth considering.
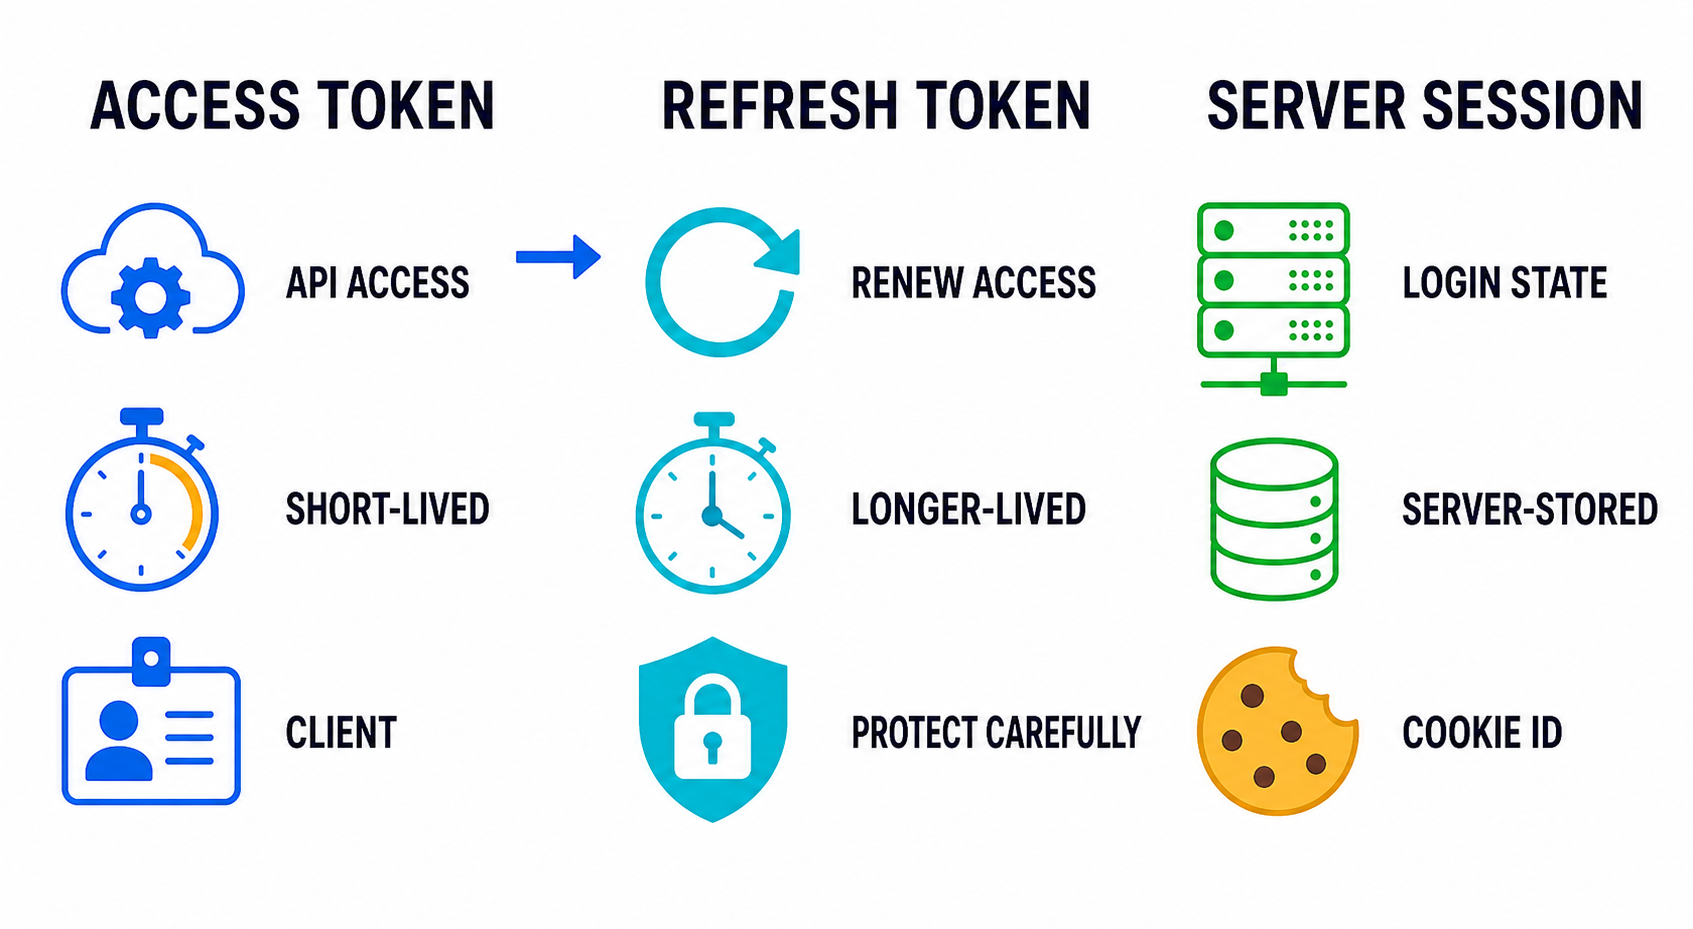
Use short-lived access tokens for API calls. Treat refresh tokens as higher-value credentials and consider sessions when they keep the architecture simpler.
HS256 vs RS256: Which Signing Algorithm Should You Use?
The right algorithm depends on your architecture.
| Algorithm | Key model | Suitable starting point |
|---|---|---|
HS256 |
One shared secret signs and verifies tokens | A small application where one trusted backend issues and validates tokens |
RS256 |
A private key signs tokens; a public key verifies them | Multiple services that need to verify tokens without receiving the signing key |
The Flask demo uses HS256 because it is easier to understand in one file. A larger system may prefer asymmetric signing so verification services receive only a public key. Whichever approach you use, configure an explicit allowlist of accepted algorithms during verification. Do not let an incoming token decide what your API will trust.
Security Best Practices for JWT Authentication
JWT is a format, not a complete security strategy. Use the following controls together.
Use HTTPS Everywhere
Tokens are credentials. Send them only over HTTPS in production so network observers cannot read them in transit.
Keep Access Tokens Short-Lived
Use a short expiration period appropriate for your application. Add a refresh-token strategy only when users need longer sessions.
Validate the Signature and Required Claims
At minimum, validate the signature and expiration. For systems with defined issuers and audiences, verify iss and aud as well. Require every claim your authorization logic relies on.
Keep Sensitive Data Out of the Payload
Base64url encoding is not encryption. Anyone holding a typical signed token can inspect its payload.
Store Signing Keys Outside the Repository
Use environment variables during development. Use a managed secret store in production. Rotate keys deliberately and document the process.
Plan for Logout and Revocation
A signed token can remain valid until it expires unless your system adds revocation behavior. Short-lived access tokens reduce the risk. For refresh tokens, store server-side state so you can revoke or rotate them.
Protect Against Browser-Specific Risks
Browser storage choices involve tradeoffs. Tokens accessible to JavaScript can be exposed by cross-site scripting (XSS). Cookies can introduce cross-site request forgery (CSRF) considerations unless configured and handled correctly. Review your frontend architecture and threat model before choosing storage.
Log Authentication Events Carefully
Log failed authentication attempts, token validation failures, and refresh-token reuse signals. Do not log raw tokens because logs are frequently copied into systems with broad access.
Common JWT Mistakes
Mistake 1: Assuming the Payload Is Secret
JWT payloads are commonly readable. Store only the minimum claims the API needs.
Mistake 2: Accepting Any Algorithm
Pass an explicit algorithm allowlist to your JWT library during decoding. The example uses:
algorithms=["HS256"]
Mistake 3: Omitting Expiration
An access token without exp can remain usable far longer than intended. Require and validate expiration.
Mistake 4: Putting Tokens in URLs
URLs can appear in browser history, analytics systems, server logs, and referrer headers. Send access tokens in the Authorization header.
Mistake 5: Hardcoding Secrets
Secrets committed to a repository can leak through clones, logs, or copied code. Load them from a secure configuration source.
Mistake 6: Using JWT When a Session Would Be Simpler
Do not add token refresh, revocation, and browser storage complexity unless your application benefits from a token-based architecture.
Performance Tips
JWT verification is normally small compared with database queries and network calls, but good design still matters:
- Keep payloads minimal because the token is sent repeatedly.
- Avoid loading a full user record when the endpoint only needs a stable user ID and a small authorization claim.
- Cache public verification keys appropriately when using asymmetric signing and key rotation.
- Use short-lived access tokens without making expiration so short that clients constantly refresh them.
- Measure before optimizing. Authentication correctness matters more than tiny reductions in decode time.
Real-World Example: Protecting an Account Endpoint
Imagine a learning platform with a mobile app and a REST API. A user signs in once, receives a short-lived access token, and requests /profile, /courses, and /progress. Each endpoint validates the token before returning private data.
The JWT payload might include:
{
  "sub": "user-123",
  "iss": "https://api.learning-app.example",
  "aud": "learning-mobile-app",
  "iat": 1716999100,
  "exp": 1717000000
}
The API can use sub to load the correct account. It should still enforce authorization rules. Authentication answers who is making the request. Authorization answers what that user is allowed to do. A valid token for a regular user must not grant access to an administrator endpoint.
This distinction is important when learning about broader cybersecurity threats and defenses.
Frequently Asked Questions
Is JWT authentication secure?
JWT authentication can be secure when the application uses HTTPS, verifies signatures, accepts only expected algorithms, checks expiration and other required claims, protects keys, and plans for revocation. JWT is not automatically secure simply because a token exists.
Is a JWT encrypted?
Not usually. A typical signed JWT protects integrity, not confidentiality. Its payload can be decoded by anyone who obtains the token. Use encrypted token formats only when your architecture specifically requires them, and never place unnecessary secrets in a token.
Where should I send a JWT?
For API requests, send the access token in the HTTP Authorization header:
Authorization: Bearer <access-token>
Avoid placing access tokens in URLs.
How long should a JWT access token last?
There is no universal duration. Use a short lifetime based on the sensitivity of your application and its user experience requirements. Add a carefully designed refresh-token flow when longer sessions are necessary.
What is the difference between authentication and authorization?
Authentication verifies identity. Authorization decides permissions. A valid JWT can identify a user, but each endpoint must still enforce what that user is allowed to access or change.
Should I use JWT or server-side sessions?
Use the simpler model that fits your application. Server-side sessions are often a good choice for browser-based applications. JWTs are useful when APIs, mobile clients, or multiple services benefit from portable tokens and stateless validation.
Can I decode a JWT without validating it?
Libraries may let you inspect a JWT without verifying its signature, but never trust unverified claims for authentication or authorization decisions. Decode and validate the token before using its contents.
Official References
- RFC 7519: JSON Web Token (JWT)
- OWASP JSON Web Token Cheat Sheet
- PyJWT documentation
- MDN: Authorization header
Conclusion
JWT authentication is a practical way to protect REST API endpoints when your application benefits from token-based identity. The core flow is straightforward: verify credentials, issue a short-lived signed token, send it in the Authorization header, and validate it before serving protected resources.
The security details are the real work. Keep JWT payloads minimal, verify signatures and required claims, accept only configured algorithms, store keys outside your codebase, use HTTPS, and plan for logout and token renewal. Start with the Flask example, then adapt the design to your application’s threat model before deploying it.